Using the bank account register allows you to keep track of deposits and payments. The deposits are connected with transactions that you enter in CMS. This allows you to see exactly where your money is going and keep track of transactions deposited into your account.
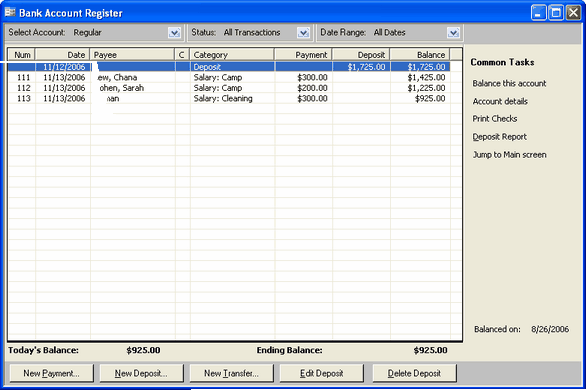
To access the Bank account register, click the Bank Register button on the Home tab. Select an account from the top of the screen. To set up your list of accounts, Click Program Setup > Custom List Setup > Bank Accounts.
Payment
To enter a new payment, click on the New Payment command button found on the bottom of the screen.
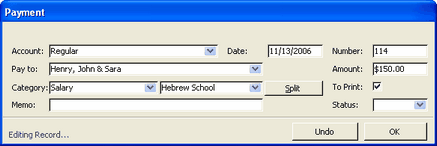
Account:
Choose the account from which you would like to make a payment from the drop-down list. By default, it will be the account that you were previously accessing.
Date:
Enter the date of this payment. By default, it is today's date.
Number:
Enter a check number
Pay To:
Choose a contact that you are making a payment to, or type in a new one. If you type in a new payee, CMS will ask if you would like to add this contact to the list. Choose Yes to continue making a payment to this contact or No to choose another contact.

Amount:
Enter the amount.
Category:
Choose a category and subcategory for this payment. For information on customizing categories and subcategories, see Tools Menu > Category Manager. It is important that all transactions be linked to categories for accurate reporting and budgeting.
Note: Only active categories will be displayed here.
Split:
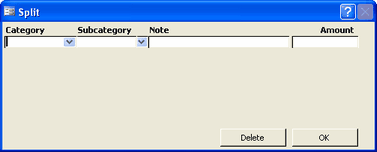
If this payment falls under two categories--for example if you are paying for supplies for camp and for items for an upcoming Rosh Chodesh Event in one store with one check, you should click on Split and enter the appropriate amounts of each split on a separate line. You can also choose Split from the category drop-down list.
Memo:
Enter an optional memo.
To Print:
If you need to print this check, check off this box. For more information on printing checks, see printing checks later on.
Status:
Choose if it's reconciled, void or cleared. This status can be changed at a later point. To edit or delete a payment, first select the payment and then click the Edit Payment or Delete Payment button found on the bottom.
Deposit
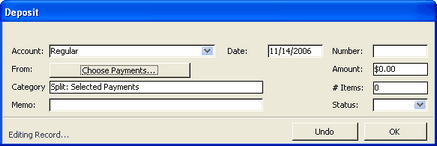
To enter a new deposit, click on the New Deposit Command button.
Account:
Choose the account in which you want to make a deposit.
From:
Click on Choose Payments to choose a payment in the database which you want to deposit.
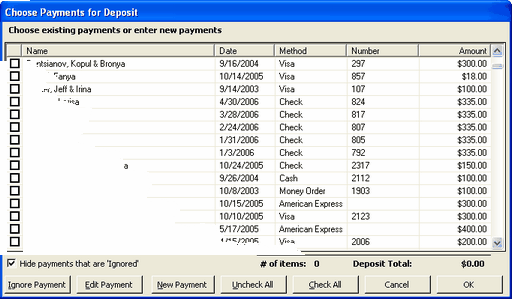
Check off all those that you would like to deposit and click OK to apply them or Cancel to cancel.
You can also Edit an individual Payment by selecting a payment and clicking on Edit Payment. The transaction screen will open up to that transaction where you can make any changes or edit whatever is necessary. For more information on editing transactions, see Transactions Tab >Edit/View Transactions
To deposit a payment that has not yet been entered in the database, click on New Payment. The transaction screen comes up, with the only difference being that you can choose the name from a drop-down list. For more information on entering payments, see Transactions Tab > New Payment.
Note: In order to make a deposit you must have the payment entered in CMS either through using the transactions tab or through the New Payment button. The contact must be in CMS in order to make the deposit. This is required for accurate reporting.
Ignore Payment:
Sometimes you would like to ignore a payment that you know has been deposited but are unsure of the details. You can choose any payment and click on the Ignore Payment button to ignore the payment. Ignored payments are hidden from the Choose Payments screen unless the Hide payments that are "Ignored" checkbox is unchecked. To check all of the payments, click on Check All. To uncheck any checked items, click on Uncheck All.
The Category, Amount, and # of Items will be updated automatically based on the payments you select.
Memo:
Enter an optional Memo.
Status:
Enter the status--Cleared, Reconciled or Void. This option can be left blank and changed at a different time.
To edit or delete a deposit, first select the deposit and then click on Edit Deposit or Delete Deposit.
Transfer
To transfer funds from one account to another, click on New Transfer.
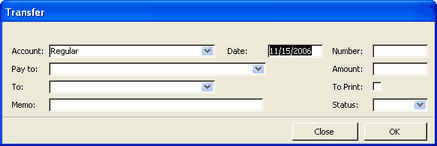
Account:
Choose the account you are transferring from. If this transfer is related to a payment to a contact, choose that contact from the Pay to drop-down list.
To:
Choose the account to transfer to.
Memo:
Enter an optional memo.
Date:
Enter the date
Number:
Enter a check number if the transfer includes a check.
Amount:
Enter the amount
To Print:
Check this box if you need to print a check in connection to this transfer.
Status:
Enter if void, cleared or reconciled. This status can be left blank and filled in at a later point.
Balancing Accounts
To Balance an account, click on Balance This Account found under Common Tasks in the right section of the bank account register. To balance an account you would need a recent bank statement.
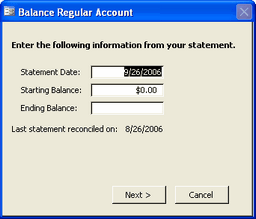
Enter the information from the bank statement.
Statement Date:
Enter the date of the statement
Starting Balance:
Enter the starting balance that is printed on your statement
Ending Balance:
Enter the ending balance that is printed on your statement.
Click on Next > to continue or Cancel to cancel balancing your account.
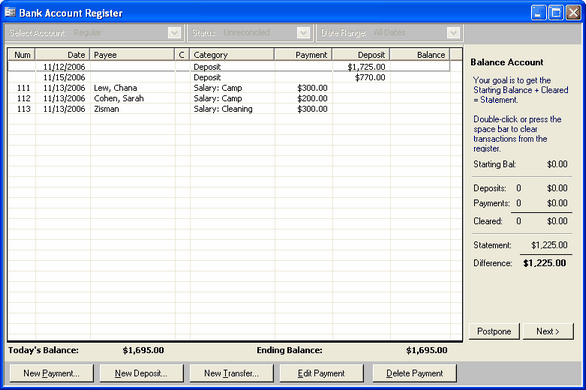
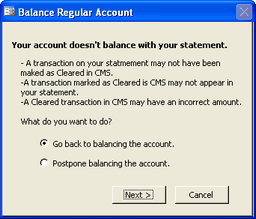
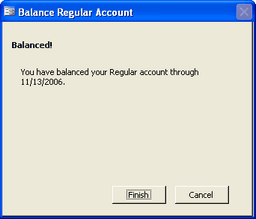
In the right pane, there will be information about balancing your account. Click on each deposit or payment that appears on your statement and double-click it or press the spacebar to mark it as Cleared. As the transactions are cleared, the information will show up in the right pane, showing how much more you need to reach to balance the account. When you are done, click on Next >. If the account is not balanced, CMS will tell you that and will give you the option of postponing or going back to balance your account. If your account is balanced, CMS will inform you of that as well. On the bottom of the Common Tasks pane, it will say the date that the account was last balanced, and if the account balances, the date will change to today's date.
Account Details
To see the account details, click on Account Details in the Common Tasks pane. A screen will pop-up with the information that you entered under Tools > Custom Lists Setup > Accounts. You can edit any information through that screen, however you can only view or edit information on the account that you are currently viewing. To view or edit information about any other account, you can either access it through Tools > Custom Lists Setup > Accounts or by going to that account through the account register and clicking on Account Details.
Print Checks
To print checks, click on Print Checks on the Common Tasks pane. You can either select payments from the transactions screen by using the Shift key to select payments that are next to each other or Ctrl if they are not, or you can choose to print checks from the To Print list. The To Print list is based on the payments that are marked To Print.
Note: In order to print checks, you have to have a check template listed for this account in the account details.
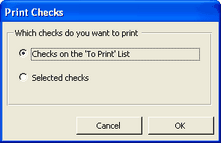
When you are done printing the checks, click OK on the screen that pops up to remove the checks from the To Print list. You can always reprint individual checks as described above or put payments back on the To Print list by editing the payment.

Deposit Report
To print deposit slips for individual deposits, or to see what transactions are included in a deposit, select the deposit and click on the Deposit Report found in the Common Tasks pane.
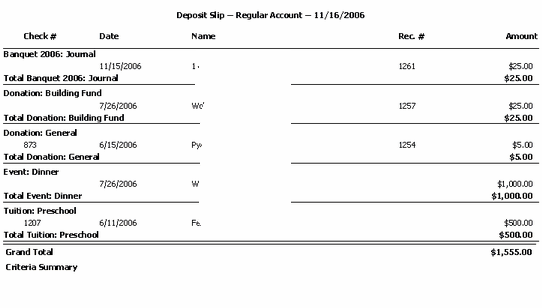
The Deposit slip will list the category, check number, date, name, receipt number and amount of each individual transaction included in this payment. It will also give you the total for each category and subcategory.
Filters
On the top of the bank account register, there are filter options.
Account:
Choose the account you want to view.
Status:
Choose to view All Transactions, or only Unreconciled, Reconciled, Cleared or Voided transactions.
Date Range:
Choose to view transactions of All Dates or only transactions that are in the Current Month, Current Year, Last 3 Months or Last 12 Months.
Exiting
To exit the bank account register, either click on the red X found in the top right-hand corner, or click on Jump to Main Screen found on the Common Tasks pane.