The new Form Designer offers greater flexibility and more features, is more intuitive and simple to use, and generates beautiful forms for your site.
Click Tasks > Online Form Submissions > Forms Setup (or Form Designer on CMS CONNECTED in older CMS versions) to bring up the Form Designer.

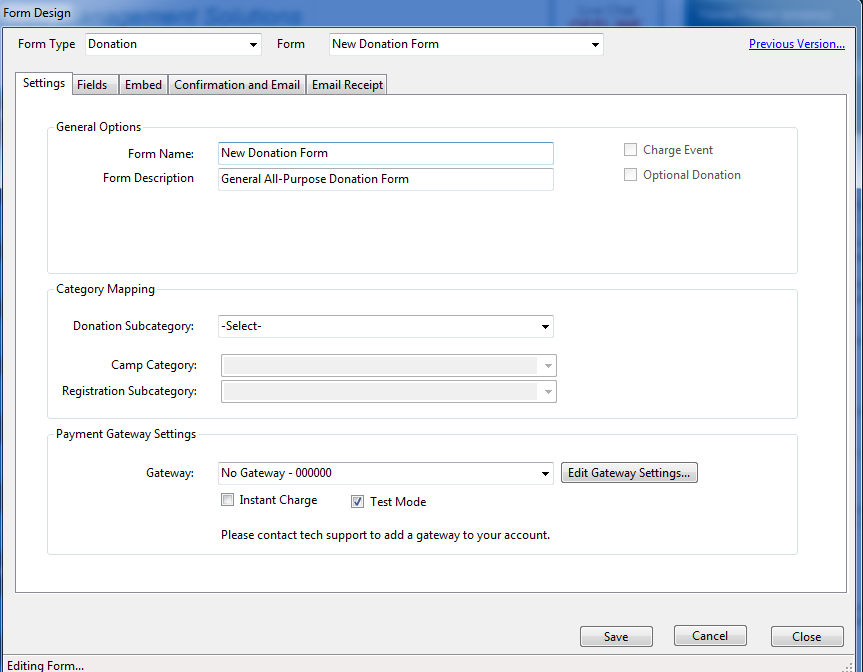
Select Donation from the Form Type drop-down to show your Donation type forms. Then select the form you want to work with.
In the above screenshot, we selected "New Donation Form."
(Note: If one or more of your forms don't show up in the Form drop-down and you are upgrading from an earlier version of CMS CONNECTED Forms, click the "Previous Version" link, select your form, and click Upgrade Form. This will add your old form to the new Form Designer.
IMPORTANT: Once a form is upgraded, it will no longer be available in the "Previous Version" and any existing sites that have the old embed code (html) will automatically forward to the new design.)
To save any changes you made to the Form Settings on any of the tabs, click the Save button. Clicking Cancel will cancel any unsaved changes. Clicking Close will close the form. If there are unsaved changes, you will be prompted if you want to save them before closing.
Below is a short description of each of the options and what they are for. Options that are disabled don't apply to the type of form you are working with.
Settings Tab
 General Options
- Form Name: This is where you give your form a name. It is the name that will show up in the Form drop-down.
- Form Description: A slightly more detailed description of the form.
Category Mapping
- Donation Subcategory: When a person submits a donation of your website using this form, this Subcategory will be used when the submission is auto-entered into CMS. You should always have something entered in this field even if you are showing Purpose on your form allowing the donor to choose the purpose of his donation (see Fields tab).
Payment Gateway Settings
- Gateway: If you would like your form to automatically charge the card when submitted, select your gateway from this drop-down and check the "Instant Charge" check box. Otherwise, "No Gateway - 00000" should be selected." If your gateway does not appear on this drop-down, please contact tech support for assistance.
- Instant Charge: This check box must be checked, in addition to selecting your Gateway, in order to have the card charged when the form is submitted.
IMPORTANT only use instant charge after enabling and configuring Authorize.net's Fraud Protection.
- Test Mode: Applicable to Authorize.net only. This box should only be checked during when you are testing your form. When a Gateway is selected and Instant Charge is checked, if Test Mode is also checked, the form sends the charge to your gateway as a test only. If the test is successful, the submission is treated as if the card was charged. Be sure to uncheck Test Mode when the form is in use (live) on your website.
Other gateways such as SequelPay ignore this setting and will put through the charge even if this is checked.
- Edit Gateway Settings button: If you need to update the API Transaction Key of your gateway, click this button and paste the new Transaction Key. This only needs to be done if a new Transaction Key was generated in Authorize.net. Changing the Transaction Key will affect all forms that are using this Gateway.
You can also see your current API LoginID and Transaction Key by clicking this button.
Fields tab
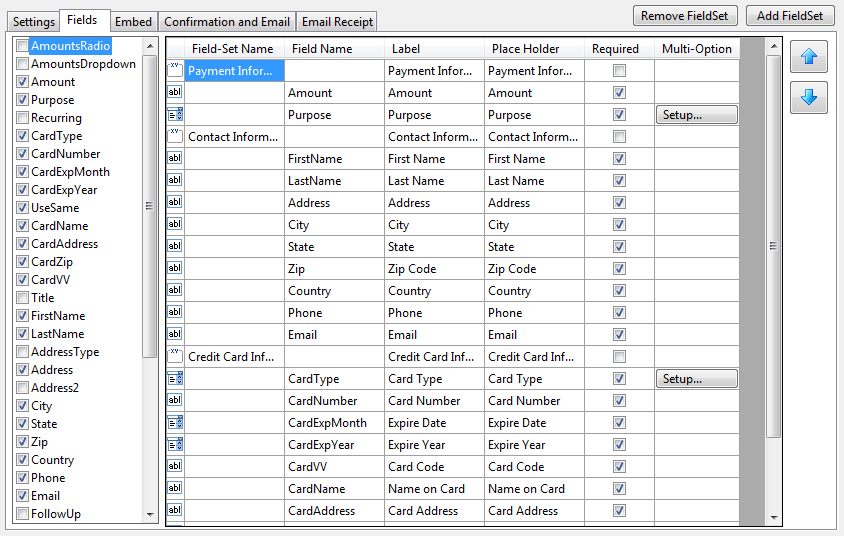
FieldSets
- Overview: A FieldSet is a group of fields the are displayed together on the form. When adding fields to your form, they are placed in a FieldSet. Fields cannot be on a form on their own; they have to be part of a FieldSet. Examples of FieldSets are Payment Information, Contact Information, etc." In our example, the Contact Information FieldSet has the following fields: FirstName, LastName, Address, City, State, Zip, Country, Phone and Email.
- Adding a FieldSet: You can add a FieldSet to your form by clicking the "Add FieldSet" button. The new FieldSet gets added to the bottom of the Form. Once a FieldSet has been added to your form, you can change the label, add header text and add fields to that FieldSet.
- Changing the FieldSet Label: Enter text you would like your FieldSet to display as its main header. For example: Payment Information. By default (or if left blank), this will be the same as the FieldSet Name used when creating the FieldSet.
- Adding Header Text to the FieldSet: You can add a short message to the top of the FieldSet. For example, for the Payment FieldSet, you can enter: "Please choose an amount or click Other and enter a different amount." Use the Place Holder column for this. (The term Place Holder is used here as it applies to Fields. For a FieldSet, this column is used for the Header Text.)
- Adding Fields to a FieldSet: Once a FieldSet has been added to your form, you can add fields to that FieldSet by checking the Checkbox to the left of the field (Available Fields).
If the field you want is already on the form, you can click the Up/Down arrows to move that field into the new FieldSet.
- Changing the FieldSet Order: You can move the entire FieldSet (with all its fields) up or down on the form by clicking the Up/Down buttons.
- Removing a FieldSet: Clicking "Remove FieldSet" will remove the FieldSet from your form. If the FieldSet contains fields, you first need to remove those fields from the form (by unchecking the check box under Available Fields) or move them to a different FieldSet (using the Up/Down arrows) and then remove the FieldSet.
Fields
- Adding Fields to your form: To use any of the available fields on your form, simply check the Checkbox to the left of that field. This adds the field to the right pane where you can set other options about that field, such as Label and Place Holder. When adding a field, it will be added to the FieldSet that is currently selected.
Note: There are some fields that must be visible on a donate-type form, these are: LastName, Amount, CardNumber, CardExpMonth and CardExpYear. If you attempt to uncheck these fields, a message will tell you that these cannot be removed from the form.
- Label: You can change the Label for any of the fields on your form using the Label column. Leaving the Label blank will have your form render the field without a label (make sure to use Place Holders).
- Place Holder: A Place Holder is like a Label, only that it shows within the field itself. When you click in the field, the text of the Place Holder text disappears. If you don't want to use Place Holders you can leave them blank. By default, the Place Holders are the same as the labels, but you can change it as needed. They can be more descriptive than the label and add instructions to the person filling out the form. For example: "Enter your phone number here" can be used where the label simply reads "Phone."
- Required: Check the Required check box to make a field Required. Making a field required will have the form display and asterisk (*) to the right of the field. When submitting the form, if a required field has been omitted, the field will turn read alerting the person to fill in the required field.
Note: There are some fields that must be required on a donate-type form. These are LastName, Amount, CardNumber, CardExpMonth and CardExpYear. You will not be able to uncheck the Required check box for these fields.
- Multi-Option Setup: Some fields on the form offer the person to select from a drop-down or option list. These can be setup by clicking the Setup button.
- AmountsRadio and AmountsDropDown:
For each row, you must enter an Amount and the Sort number. Sort determines the order that the Amount option will appear in the drop-down or option list. Do not add an "Other Amount" row. Other is added to the list automatically (see below: Special Fields)
Optionally, you can enter a Description and/or Memo. Description should be a short description of the Amount option for example: Pillar, Founder, Supporter, etc. Memo can be much longer, such as "Sponsors a full year tuition for a child in Hebrew School" or "Sponsors a Shabbat Dinner at Chabad."
For the AmountRadio field, it is generally not a good idea to only have some items with the Description/Memo and some without, as the options won't be rendered in a consistent fashion. The AmountDropDown won't have these limitations. In either case, you should experiment with the Description and Memo to ensure that the information you enter is rendered as you expect it on you form.
- Purpose
This field allows the donor to specify the Purpose of his donation. When the submission is auto-entered in your CMS program, the matching Subcategory is used. If you choose not to display this field on the form, or if you don't make this field Required, be sure to choose a Donation Subcategory (see above under Settings).
For each row, you must choose the CMS Category:Subcategory, Purpose and Sort.
"CMS Category: Subcategory" is the Subcategory in your CMS Program; while Purpose is the way the form will display the option. For example, you can choose "Donation: Kiddush" as the "CMS Category: Subcategory", but enter "Kiddush Sponsor" in the Purpose column. Sort determines the order the items will show in the field.
- CardType
Typical setup for this field is to enter four rows: Visa, MC, Amex, Disc; and enter the Sort as you want those fields sorted. No mapping is done for this field.
- To remove a field from the form, simply uncheck the Checkbox to the left of the field. As noted above, some fields cannot be removed and must be on the form. If you attempt to uncheck those fields, a message will appear telling you that "This field must be on the form."
- To move fields up or down, click the Up or Down arrow. If the selected field is the first field in a FieldSet and the Up button is clicked, it will move that field to the last position of the previous FieldSet. Similarly, if the selected field is the last field in a FieldSet and the Down arrow button is clicked, it will move the field to the first position of the next FieldSet.
- Special Fields: Some of the fields will react in special ways. Here are some examples.
- AmountsRadio; AmountsDropDown; Amount.
- As noted, the Amount field must be on the form and is Required. AmountsRadio and AmountsDropDown don't have to be on the form and they cannot be set to Required.
- In addition, if you make both AmountsRadio and AmountsDropDown fields visible on the form, only the first one will actually display; the second one will be ignored.
- Regardless of where the AmountsRadio/AmountsDropDown appear in the field order, they will always render right about the Amount field.
- When AmountsRadio or AmountsDropDown is visible on the form, "Other" is automatically added the the list of options and the Amount field will be hidden. When "Other" is chosen, the Amount field will be displayed.
- Recurring: This means that the card will be set to automatically charge the amount submitted for 12 months. If the form is set to auto-charge (see above: Payment Gateway), the first charge is done right away and a bill is created (when the submission is auto-entered) in CMS for the subsequent 11 times, otherwise, the bill will have 12 scheduled charges.
- CardExpMonth, CardExpYear: These two fields will render on a single line. Being that this is the case, only the label for CardExpMonth is used for that line (the CardExpYear label is ignored). Using the Place Holder fields you can make it clear what each field is for. For example: For CardExpMonth, enter "Card Expiration Date" as the Label and "Expire Month" as the Place Holder. For CardExpYear, enter "Expire Year" as the Place Holder.
- Address: The Address fields is used (in addition to LastName) to auto-match submissions with any existing contacts already in your CMS database. We therefor recommend that this field be on the form and made Required.
- Custom Fields: While you can add up to five custom text fields and five custom check box fields to the form, they are not handled at all by the CMS Program and will not show up in your CMS database. The email notification will include these fields and they will be available online. Same with Follow Up and Note.
Embed tab
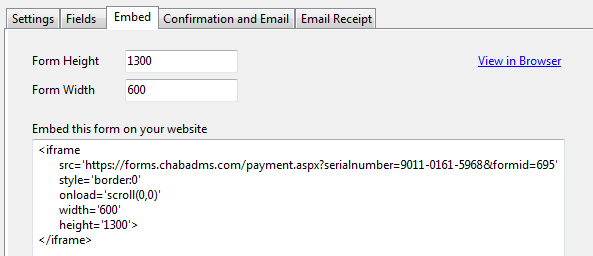
- Form Height and Width: These determine the height and width the iframe should render. While the Form Designer does some form of calculation based on the fields selected, etc. These might need to be adjusted manually. To do this, click the View in Browser link which will open your Form in a separate browser window where you can see how the form will actually be displayed. If it is too wide/narrow or a scroll bar is showing (meaning the form is not high enough), increase/decrease the Height and/or Width accordingly and preview it again.
For responsive display of the form (for mobile), so that the form should automatically adjust its width to the size of the screen, change the width to 100% (not a fixed value). Like this: width='100%'. Because a large percentage of your users will be viewing your form on mobile devices and tablets, we recommend that this setting be used.
- View in Browser link: This allows you to preview a live version of your form. This preview is your actual form and you can test everything in this preview. Submissions to this preview will be processed (based on your Payment Gateway settings, see above) and successful submissions will appear in your CMS CONNECTED account and auto-entered in your CMS Program. The only difference here is: that this is not on your website, but on a standalone page. Use this preview to do all testing and field configuration. As soon as a change is saved in the Form Designer, the preview is updated automatically. All you need to do is click Refresh in your browser.
- Embed Text: When the form is ready and tested, copy this html text and paste it onto your website.
If you are using ChabadOne, you can find more detailed instructions here.
Remember: Any changes made to the Form Designer take effect instantly. There is no need to re-paste the html. If you add fields, etc. which will make your form take up more space; you may need to increase the Height (as described above) to avoid having a scroll bar displayed.
Confirmation and Email
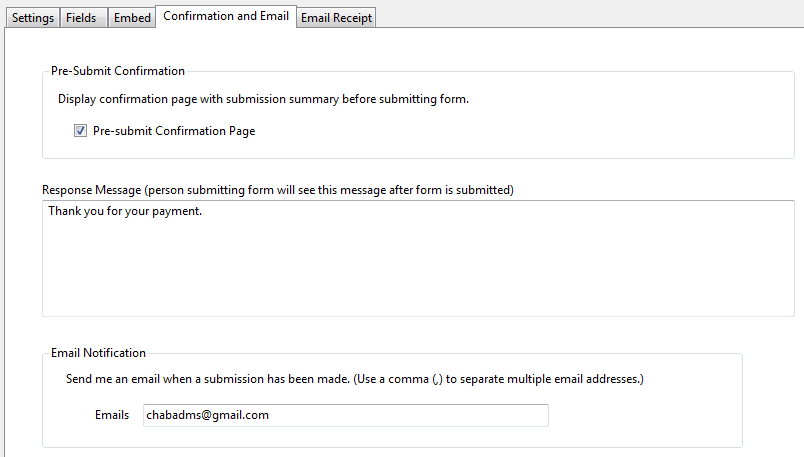
- Pre-Submit Confirmation: You can now have a page displayed to the donor asking him to confirm his donation. This page will show a concise layout of the information he is about to submit. To enable this options, click the Pre-submit Confirmation Page.
- Response Message: Type a message that the donor will see after successfully submitting his donation. For example: "Thank you for your donation. Your support will go a long way in ensuring Jewish continuity in the Colorado Everglades."
- Email Notification: Type your email address. This is where you will be notified by email of the submission that was made. The notification email sent will include the submission details. You can enter multiple email addresses, separated by a comma (,). For example, rabbi@chabadhouse.com, rebbetzin@chabadhouse.com.
Email Receipt
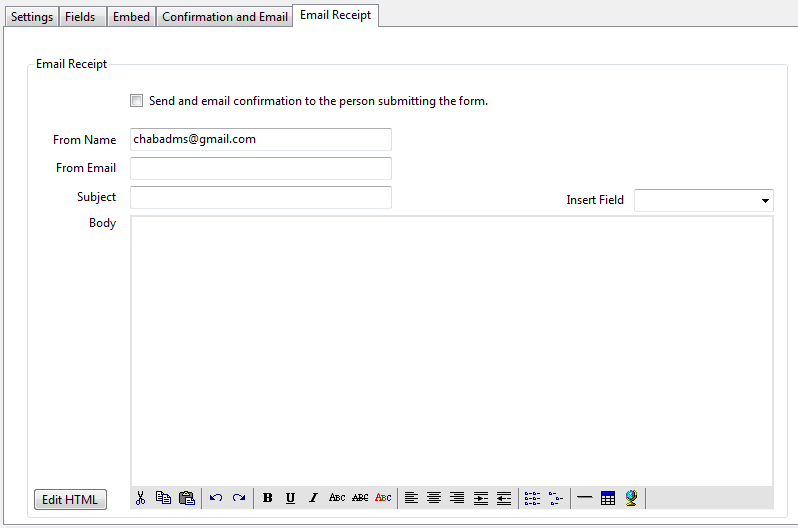
You can now have CMS CONNECTED send an email receipt to the person making the donation.
- To enable this feature, click the "Send an Email confirmation..." Checkbox and configure the following fields:
- From Name: This is the name in the From field.
(Note: Due to latest email security implemented by email companies, the email will actually read as follows: FROM: Rabbi Yisroel Pinson via CMS, for example)
- From Email: If the person were to click reply to the email, the From Email will be used to reply to.
(Note: Due to latest email security implemented by email companies, the from email will actually be submissions@chabadms.com)
- Subject: The subject of the email
- Body: The text of the email. The email is sent out formatted in HTML. You can use the formatting toolbar at the bottom of this window to format your email as you see fit. You can also insert any of the fields from the list of fields (Insert Field drop-down). If you want to edit the email in HTML, click the Edit HTML button.