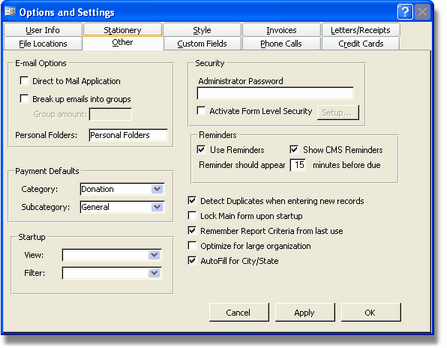
Click on Program Setup > Options and then select the 'Other' tab. Here is where you can choose other miscellaneous options such as a password, reminders and other options.

E-mail Options:
Direct to mail application-When clicking
the Email button to send an individual email, you can choose whether to
directly open up your mail application or a CMS window. Opening it in a
CMS window will give you the option to save the e-mail as a history
note.
Check off the checkbox if you would like to break up emails into
groups when sending out batch emails. Enter the group amount in the
text box.
Personal folders--Here is where you indicate what the root folder for History > Emails is. Indicating what the Root folder name is. Email correspondence searching only works with outlook.
Payment Defaults:
Enter the default category and subcategory for the default payments.
Startup:
Choose whether to start up CMS in List View or Contact View. If no
option is chosen, CMS will start up in the Contact View. You can also
choose a filter that will be applied upon startup by selecting a
defined filter from the drop-down menu. If no option is chosen, CMS
will show all contacts with no filter applied.
Security:
Enter an administrator password. CMS will ask
for this password when opening the program. This only blocks critical
areas. For more comprehensive security you also have an option to Activate Form Level Security.
This allows you to set up different passwords for different users as
well as assign them to specific areas and tasks in the program. For
example, you may assign someone security clearance to work with the
bank account register, whereas another person in your organization
won't be able to access that. To use Form Level Security, click the
check box. A form will open up which will allow you to setup the form
level security. For more information on Form Level Security, see Security.
Reminders:
Here is where you can choose whether or not to
show reminders from outlook that were put in through the calendar and
tasks and CMS reminders which you can enter by notes and occasions.
Click the appropriate checkbox for each and then select how long before
they are due, the reminders should show up.
Other Options:
Here is where you can choose options such as:
Detect duplicates when entering new contacts:
Have CMS automatically detect and warn you of a suspected duplicate when you enter the information.
Lock main form upon startup: Locks the main form so that no information can be entered until the main form is unlocked. See Main Screen > General > Locking for more information.
Remember Report Criteria from last use:
Automatically
puts in the criteria for reports based on your criteria from the last
use. You can change the criteria as you set the criteria for the
report. See Reports for more information on reports.
Optimize for Large organizations:
Click this checkbox to optimize the program for large organizations.
Autofill for City/State:
Clicking this checkbox will
automatically input the city and state of new contacts to be the city
and state of your organization.