To generate batch letters, click Tasks > Letters & Receipts.
The Batch Letters screen will appear.
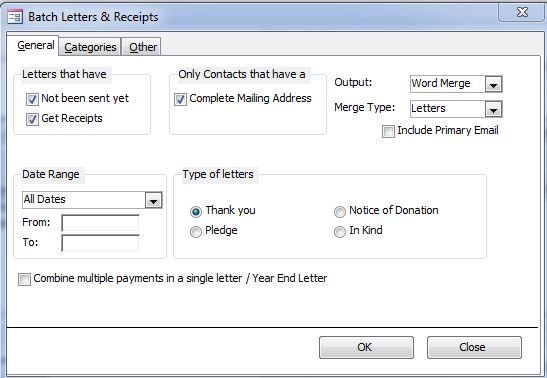
The most important things on this screen is the Type of Letters, the Output and the Merge Type.
Type of Letters
Select Thank-you, Pledge, Notice of Donation, or In Kind.
You can only batch one type of letters at a time. If you want to print both thank-you and pledge letters, you need to do them in separate batches.
Output
Here you select to where you want to output the letters to.
The options are:
- Printer (merges the Merge Type directly to your printer)
- Screen (Letters, envelopes, labels or receipts show up on your screen)
- Mark as Sent (marks the batch as sent)
- Word Merge (Merges the batch to Microsoft Word)
- Export (Exports it to a different program--chose Format which replaces the Merge Type to choose the format in which to export the batch)
Job/Merge Type
Here you select what you want do with these pending letters.
The available options are:
- Letters
- Receipts (only available when outputting to a Word Merge)
- Labels
- Envelopes
Typically the procedure would be first to print letters, then envelopes or labels, and finally to mark the batch as sent.
Mark As Sent is a very important part of the process. In order for this batch not to be included in future batches, you must do the Mark as Sent output.
In order to use receipts, you must use Word and setup a Word Template to be use for receipts. You can view sample templates in C:/Chabad Management System/Sample Templates Folder
Exporting is used when you want to use another program to generate these letters. Note: If your intent is to merge to Word, you can merge directly without having to export.
Output: Screen (Print Preview)
When you click OK the letters will appear on the screen. Use the Navigation Buttons to move between the letters. Click the Print button to print the letters and choose printing options, such as choosing a specific printer or printing a limited range of letters.
Output: Word Merge
When you click OK, a window will appear asking you if you want to create a new document based on a template or use an existing document.
Combine Multiple Payments / Year End
Year-end letters is a way to combine multiple contribution acknowledgements into one letter. This is especially useful towards the year end where people may have misplaced their receipts you sent them over the year and need one letter that summarizes all their contributions. This option only works with Word Merge.
Please see MultiLetter-YearEnd for more information on this option.
If you want to, you can fine tune the batch to specify filters that will determine which transaction should be included in the batch.
You should use caution with fine tuning and ensure that when you Mark as Sent, you are using the same filters that were in place when the letters were generated. Otherwise, you may inadvertently mark as sent letters that have actually never been printed.
The Batch letters screen has three tabs. General, Categories and Other. Each of these tabs has options on further filtering the batch. Below are all the available options on setting these filters.
Not been Sent yet
By default, when generating batch letters, only letters that have not been sent yet will be included in the batch. Unchecking this box, will include letters that have been marked as Sent in this batch.
Get Receipts
By default, only transactions that you indicated to send a letter will be part of the batch. If you want to, you can include all transaction in this batch, regardless if a letter was chosen.
Note: Unless you are exporting, unchecking this box will not add transactions that have no letter specified.
Complete Mailing Address
By default, only people who have a complete mailing address (Address, City, State and Zipcode) will be included in the batch. Unchecking this box will include even those with incomplete addresses.
This is useful for seeing if there are people who did not get a thank-you or pledge letter because of an incomplete address.
Date Range
By default, all transactions of all dates are included in the batch. The batch is restricted to include only those letters that have not been sent yet. You can choose to limit the batch to a specific date range from this list or choose Custom Dates and enter a start and end date.
This is useful, if you want to reprint a group of letters that were already marked as sent.
Categories and Subcategories
By default, all transactions are included in the batch, regardless of the category and subcategory. Click the Category tab and select one or more categories to limit that batch to that selected category

If you want to limit to one or more subcategories, check the Show Subcategories box.
For pledge letters, if you want to limit the batch to one or more Subcategory Details, check the Show Subcategory Details box.
See Transactions for more information on assigning category information to payments and bills.
See Category Manager for more information on creating, modifying and otherwise managing categories, subcategories and subcategory details (pricing info).
Organization
By default, the batch will include all organizations. If you want to limit the batch to one organization, click the Other tab and choose the organization you want to limit the batch to.
You choose the organization for each transaction that is entered in the Organization field.
This is especially useful if each organization has its own stationary. This way, each organization's batch is generated separately and printed on the correct letterhead.
See Custom Lists Setup > Organizations for more information on setting up multiple organizations.
Receipt Numbers
By default, the batch will include all receipt numbers. If you want to limit the batch to a range of numbers, choose "<" (Less than), ">" (Greater than), or "Between" and enter the range.
For example, if you only want this batch to include receipt numbers 300 or higher, choose ">" and enter 300. If you only want this batch to include receipt numbers between 400 and 500, choose "Between" and enter 400 in the From box and 500 in the To box.
This is useful when you want to reprint a certain range of receipt numbers even if they were marked as sent. You can enter the Receipt Number range and uncheck the "Not been sent yet" box.
Limit to Letter
Choosing a letter from the drop-down menu, will limit your letters to one specific letter that has been specified in the transaction.